
 英語
英語 中文简体
中文简体 Русский
 Español
 Português
 Türkçe
 العربية
 Deutsch
 Polski
 Italiano
 Français
 한국어
한국어 ไทย
ไทย Tiếng Việt
 日本語
日本語





























ポータブル分光光度計
ユーザーズマニュアル
適用 LISUN models: HSCD-780、HSCD-800、HSCD-860
1. 機器の開封と基本的な操作方法の説明
1.1 主な技術仕様
| Specifications/Model Numbers | HSCD-780 | HSCD-800 | HSCD-860 |
| 他社とのちがい | Small-Caliber Testing | 高精度テスト | |
| 測定構造 | D/8、SCI | D/8、SCI+SCE | |
| 測定の再現性 | ΔE*ab ≤ 0.05 | ΔE*ab ≤ 0.04 | ΔE*ab ≤ 0.02 |
| Difference between platforms | 無し | ΔE*ab ≤ 0.4 | ΔE*ab ≤ 0.2 |
| 表示精度 | 0.01 | ||
| 測定直径 | 1 stabilizer: Φ1 mm | There are two types: stable and agile: Φ11mm, ▽11mm | There are a total of 6 stable and agile types: Φ11 mm + Φ6 mm + Φ3 mm, ▽11 mm + ▽6 mm + ▽3 mm |
| 測定パラメータ | CIE-Lab, CIE-LCh, HunterLab, CIE-Luv, XYZ, Yxy, RGB, color difference (ΔE*ab, ΔE*cmc, ΔE*94, ΔE*00), whiteness (ASTM E313-00, ASTM E313-73, CIE, ISO 2470/R457, AATCC, Hunter, Taube Berger Stensby), Yellowness (ASTM D1925, ASTM E313-00, ASTM E313-73), blackness (My, dM), color transfer fastness, color change fastness, tint (ASTM E313-00), color density CMYK (A, T, E, M), metamerism index Milm, Munsell, Hiding Power, Color Strength (Dye Strength, Tinting Power), Spectral Reflectance | ||
1.2 開封と内容物の確認
1.2.1 開梱と目視検査
When unpacking the device, handle it gently to avoid scratching the casing with sharp tools. After unpacking, first inspect the exterior of the device to ensure there is no visible deformation or dents, and that the buttons are not damaged or loose. If you notice any abnormalities with the device or its accessories, please contact us immediately.
1.2.2 本体および付属品
| 数 | お願い |
| ① | HSCD-860, including a calibration whiteboard stand and one measuring aperture |
| ② | Other alternative measurement diameters are available and can be selected based on the sample. |
| ③ | Black Calibration Box |
| ④ | USBケーブル |
| ⑤ | 充電器 |
| ⑥ | 初期設定 |
| ⑦ | ハンドバッグ |
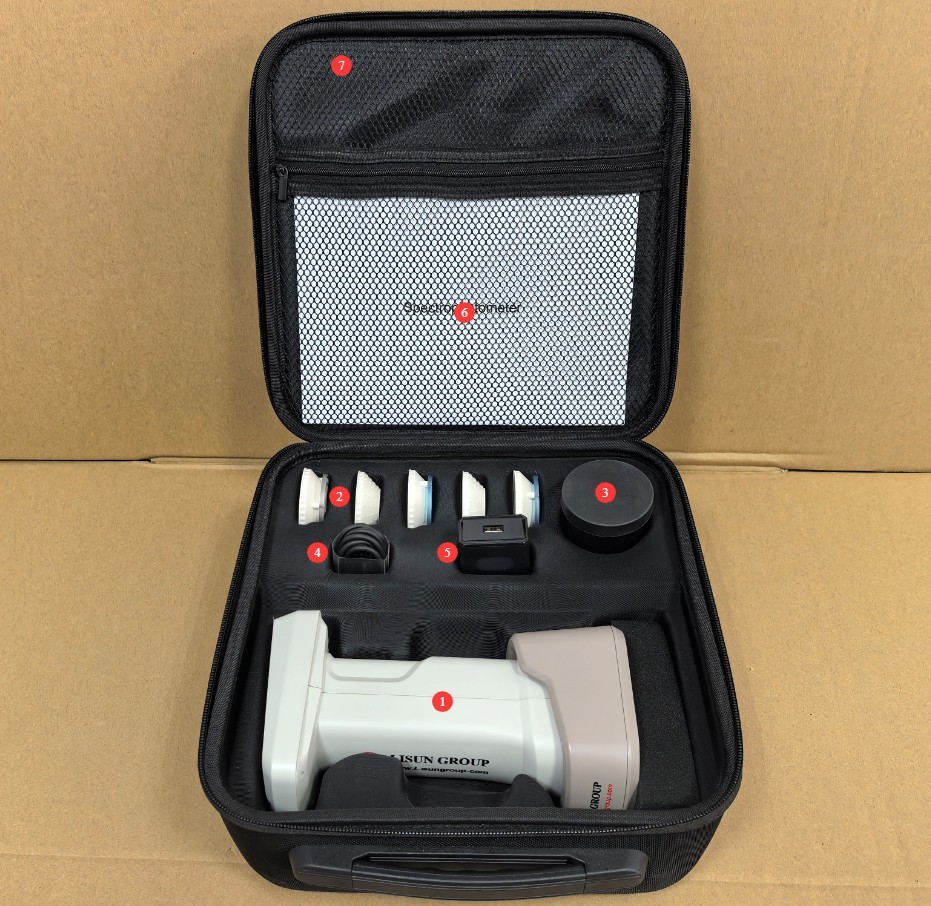
図1
Download links for the digital user manual, software, warranty card, and other materials have been sent via email. Please download them as soon as possible. If you missed the email, please feel free to contact us to request the download links again.
1.3 機器構造の説明
| 数 | お願い |
| ① Touchscreen | Display measurement results and configure parameters |
| ② USB port | Can be used to communicate with a computer |
| ③ Device Buttons | Power On (press and hold for 1 second), Power Off (press and hold for 3 seconds), Color Measurement (press briefly), Color Difference Measurement (press briefly) |
| ④ Selecting the Diameter Size | You can switch between M and S; the letter must match the letter on the measurement orifice. |
| ⑤ Calibrate the whiteboard stand | Used to calibrate equipment; it attaches to the measuring orifice end of the device via a magnetic mount. |
| ⑥ USB port | Can be used to charge devices |
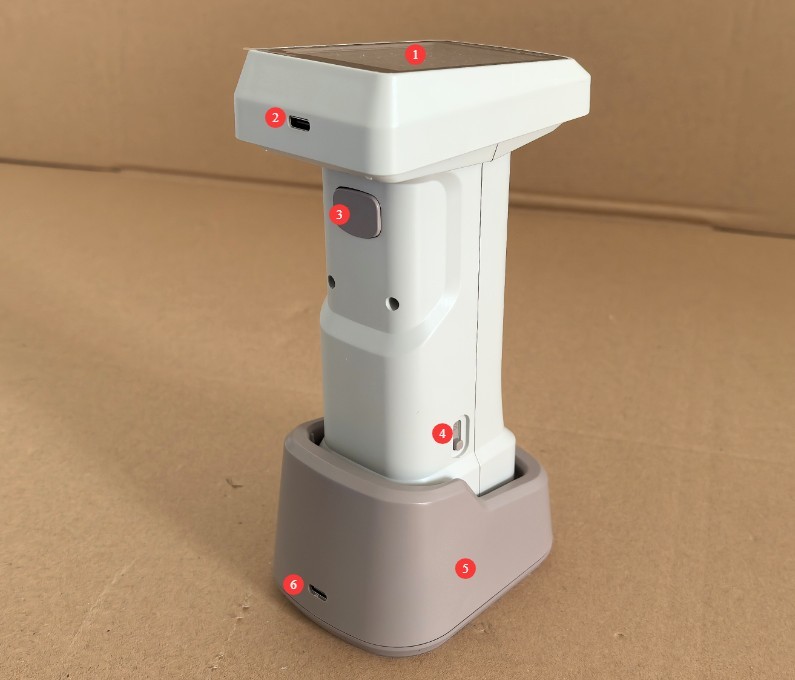
図2
2.使用上の注意
2.1 操作前の注意事項
2.1.1 環境の準備
Before taking a measurement, allow the device and the sample to be measured to sit in the same environment for at least 30 minutes to ensure their temperatures are consistent. The measurement environment must be free from direct strong light and stray light interference. Avoid operating in environments with high temperatures, high humidity, or high dust levels. The ambient temperature should ideally be maintained between 10°C and 35°C, with relative humidity ≤80%(no condensation).
2.1.2 サンプルの準備
The surface of the sample being tested must be flat, clean, free of stains, and free of scratches. If the sample is a powder or liquid, it must be placed in a special sample dish to ensure that the sample surface completely fills the measurement aperture without any gaps; Select an appropriate measurement aperture based on the shape of the sample. Ensure that the measurement end fits snugly against the sample’s measurement area to prevent light leakage.
2.1.3 設備検査
Before turning on the device, check the measurement port for dust or dirt and ensure that the buttons and ports are functioning properly. After turning on the device, check that the battery is sufficiently charged (if the battery is low, charge it first to avoid a power outage during measurement).
2.2使用上の注意
2.2.1 測定手順
When taking a measurement, position the device’s sensor perpendicular to and in close contact with the sample surface to avoid tilting or light leakage. After pressing the confirmation button, keep the device still until the measurement is complete (1 second); do not move the device during the measurement process. It is recommended to take 3–5 measurements of the same sample and use the average as the final result to minimize measurement errors.
2.2.2 Functional Operation Specifications
Do not force a shutdown or disconnect the USB cable during the device’s self-test, calibration, or measurement processes. When switching measurement parameters, wait until the display has finished loading before proceeding to the next step. If you need to export saved measurement data, ensure the connection is established before shutting down the device to prevent data loss.
2.2.3 Contraindications for Equipment Use
Do not touch the optical components inside the measurement port with your hands, and do not point the measurement end toward a strong light source. Since this is a handheld device, do not drop, bump, or crush it, and avoid exposing the body to water or other liquids.
2.3 Power Supply and Battery Safety
The built-in lithium-ion battery has a capacity of 3000mAh and is compatible only with the standard charger. Please note: Using a non-standard charger—especially a high-current fast-charging power adapter—can easily damage the battery.
Do not use the device for extended periods when the battery level is below 15%; do not charge the battery after it has been severely discharged, to avoid shortening its lifespan.
Ensure the area is well-ventilated while charging, keep the charger away from flammable materials, and unplug it promptly after charging is complete.
If the device will not be used for an extended period, fully charge it first, and then top it off every three months to prevent the battery from becoming damaged due to discharge.
2.4安全上の警告
本機の内部部品を分解したり交換したりしないでください。故障が発生した場合は、公式カスタマーサービスまたは正規販売店にご連絡ください。無許可で分解すると保証が無効になります。
If liquid, dust, or other substances enter the device, immediately turn off the power, unplug the charging cable, and contact customer service right away. Do not continue to use the device;
If equipment and accessories (such as measuring gauges) are accidentally swallowed by children, they may pose a risk of choking or other hazards; therefore, the equipment must be kept out of the reach of children;
Do not place the device near heat sources, open flames, or in high-temperature environments to prevent the battery from swelling and damage to the device’s components.
3. 機器の操作
3.1 機器の校正
The device must be recalibrated when used for the first time or after being idle for more than 8 hours. Before turning on the device, place it on the calibration whiteboard base; once powered on, the device will automatically perform a white calibration.
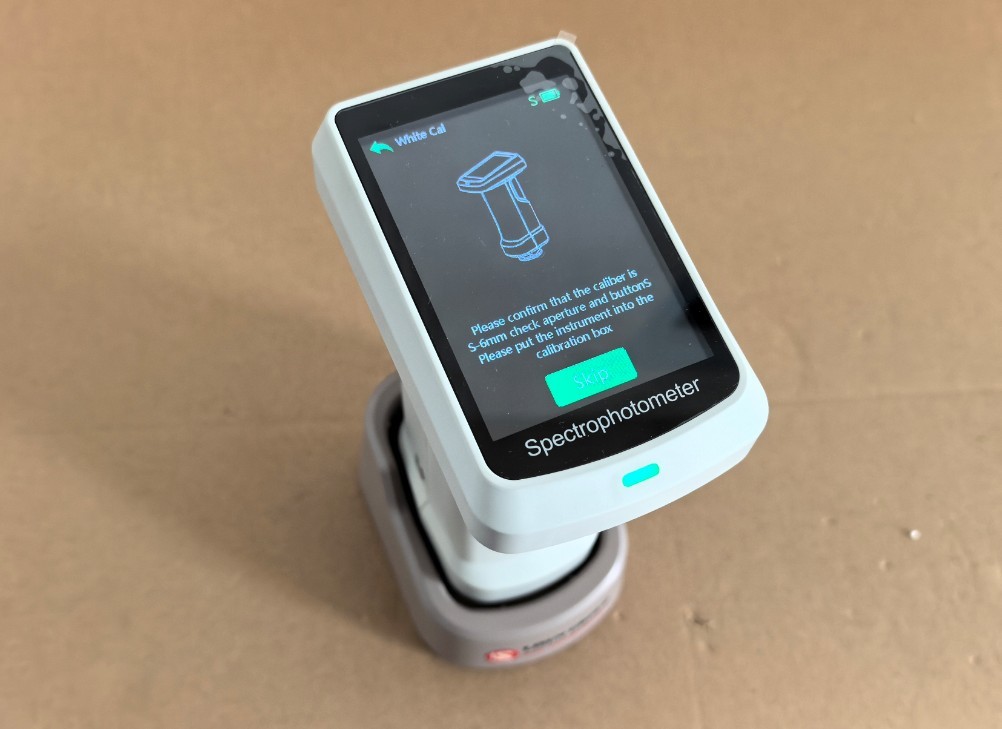
図3
Once white calibration is complete, the system will automatically proceed to the black calibration screen. Follow the on-screen prompts and place the black calibration box under the measurement aperture.
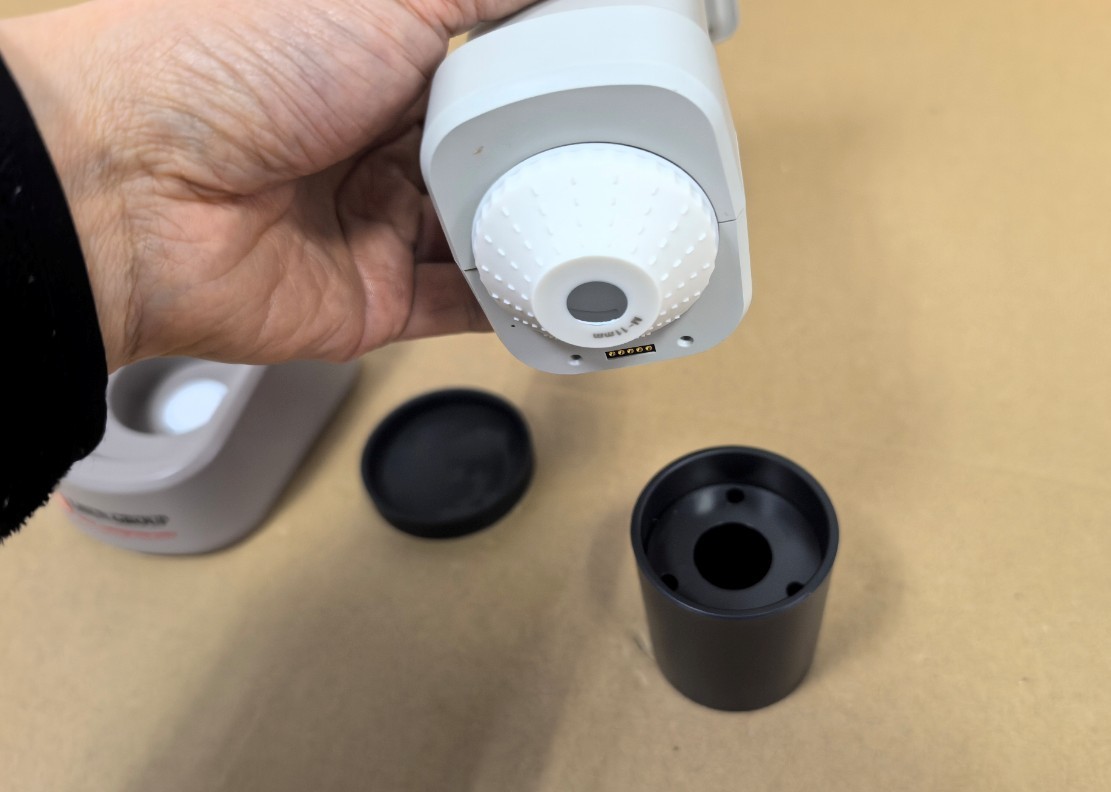
図4
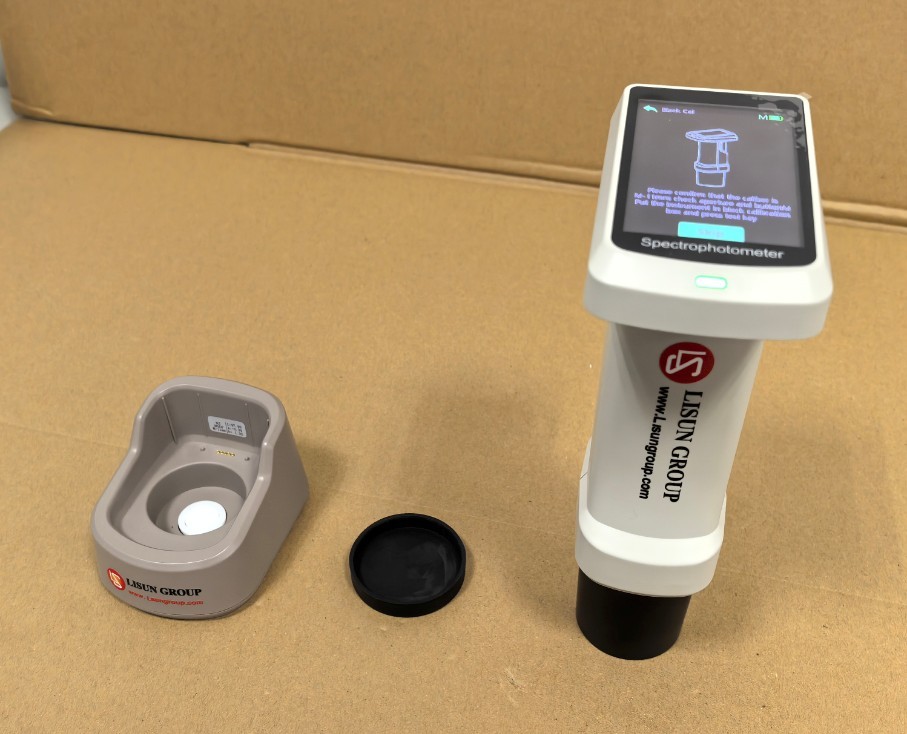
図5
Then, briefly press the device button to complete the black calibration. The device will automatically enter the measurement screen.
Note: After replacing the measurement aperture with a different size, refer to Section 3.4.3.3 on active white and black calibration before proceeding with measurements.
3.2 色測定
3.2.1 Color Measurement Procedure
Press the device button once briefly to perform a color measurement. The device displays CIE-Lab parameters by default. You can start by measuring the calibration whiteboard.
| 数 | お願い |
| ① | Click to save the color measurement results |
| ② | Click to open the color difference measurement interface |
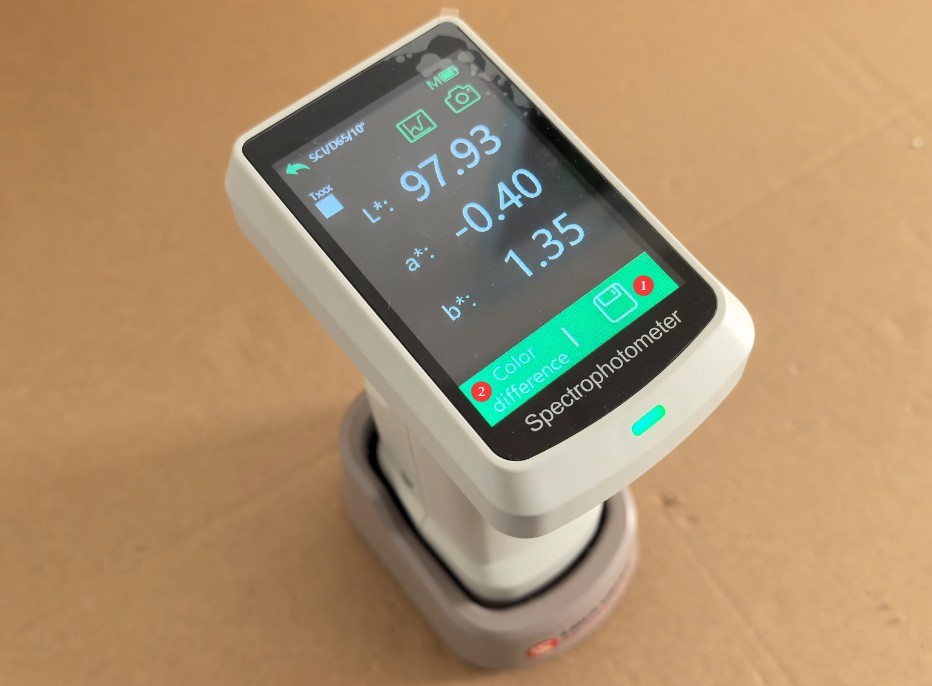
図6
If the parameters match those marked on the calibration whiteboard stand, this indicates that the device’s test results are accurate.
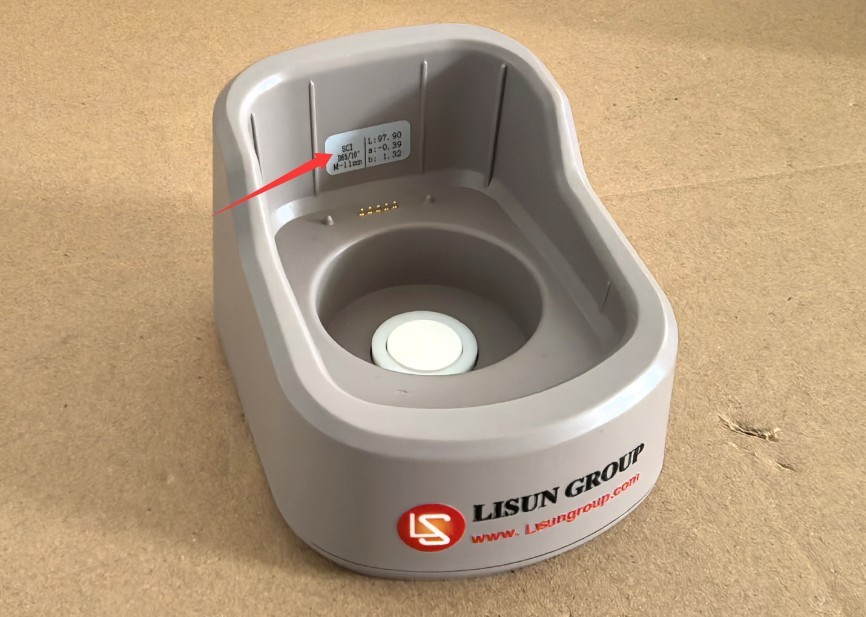
図7
Note: The base is marked with the measurement aperture required for calibrating the whiteboard, as well as its CIE-Lab values.
3.2.2 Other Features
| 数 | お願い |
| ① | スペクトラム |
| ② | カメラ |
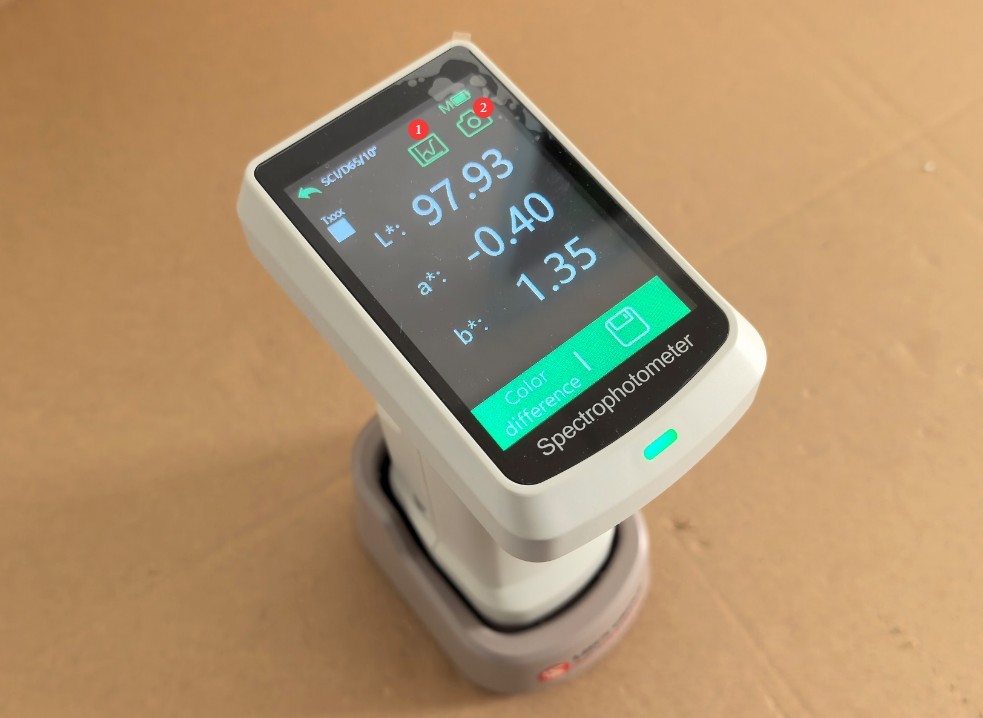
図8
Click the “Spectrum” feature.
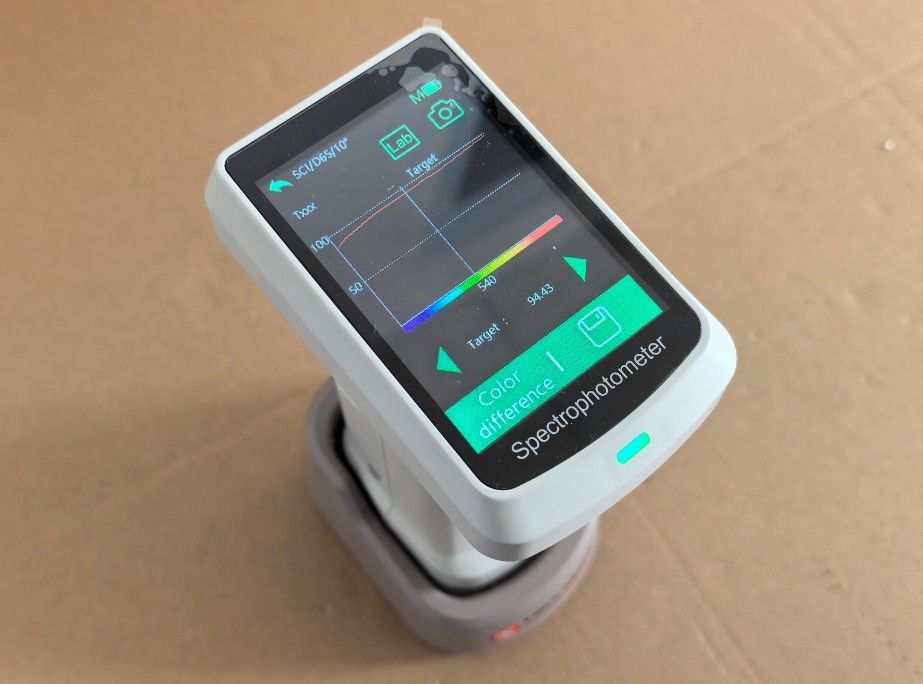
図9
Tap the camera feature to verify that the sample is positioned within the measurement aperture.
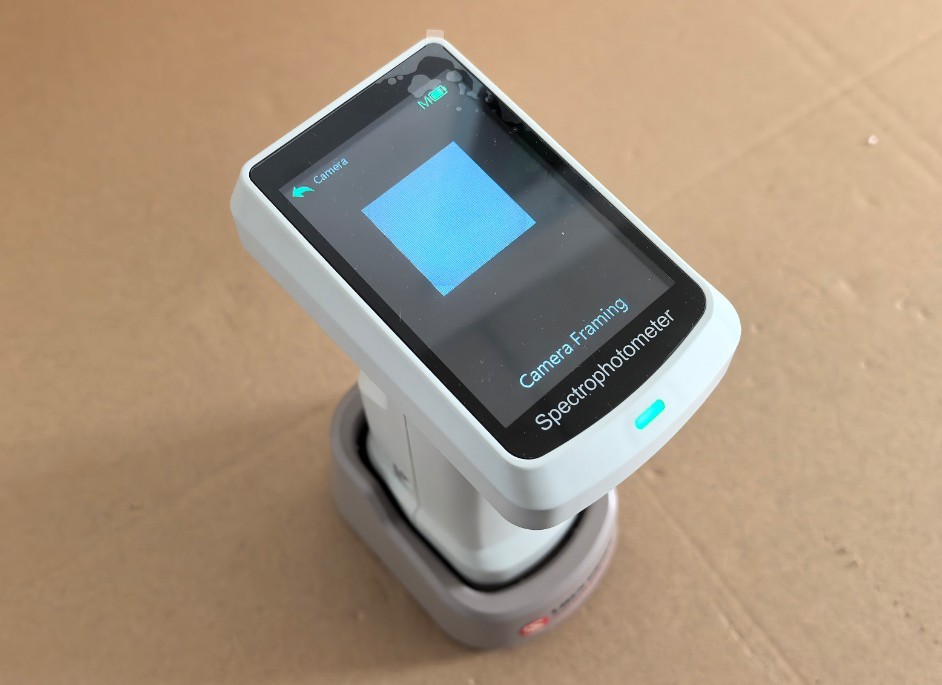
図10
3.3 Color Difference Measurement Procedure
3.3.1 Measure the reference samples first
The procedure for measuring the standard sample is the same as that for measuring color.
3.3.2 Re-measurement of Color Difference
Click to open the color difference measurement interface.
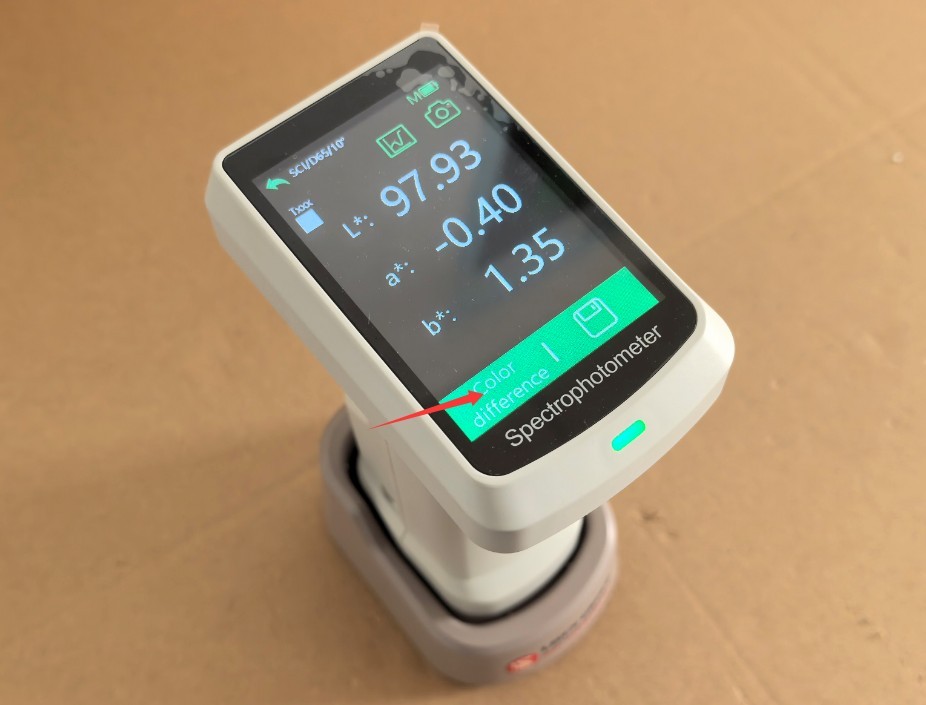
図11
Then place the measuring aperture on the surface of the sample, briefly press the device button, and the color difference measurement will begin. The touchscreen interface displays the sample measurement results, as well as the color difference between the sample and the reference standard.
| 数 | お願い |
| ① | Click to save the measurement results |
| ② | Click to return to the Color Measurement/Reference Sample Measurement screen |
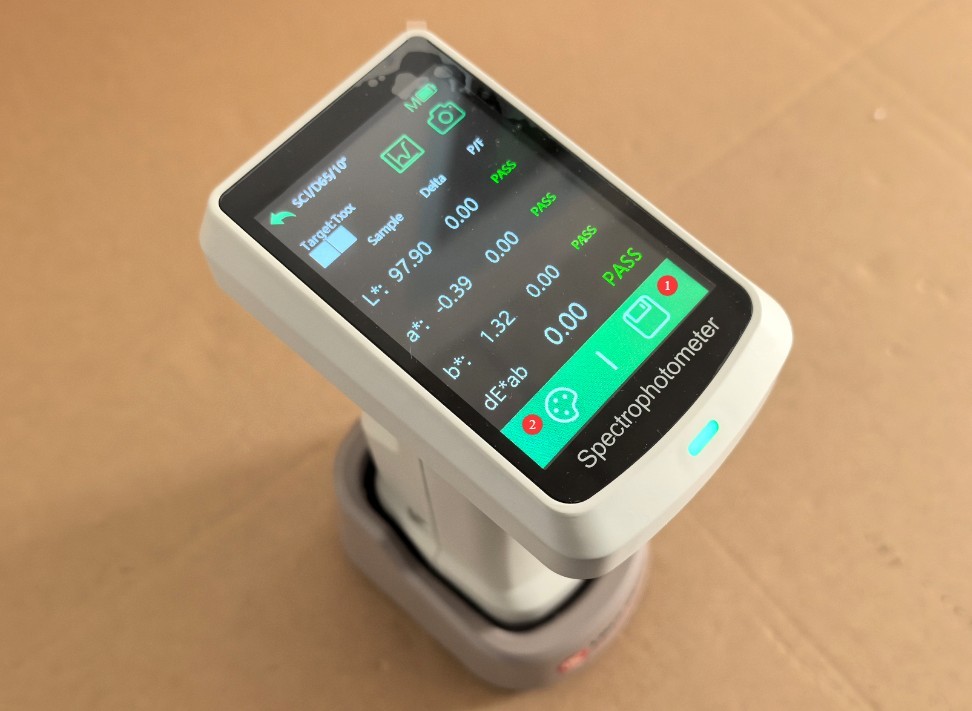
図12
3.4 Introduction to Other Function Screens
3.4.1 Preview of the Functional Interface
Click to access the navigation screen for all device features.
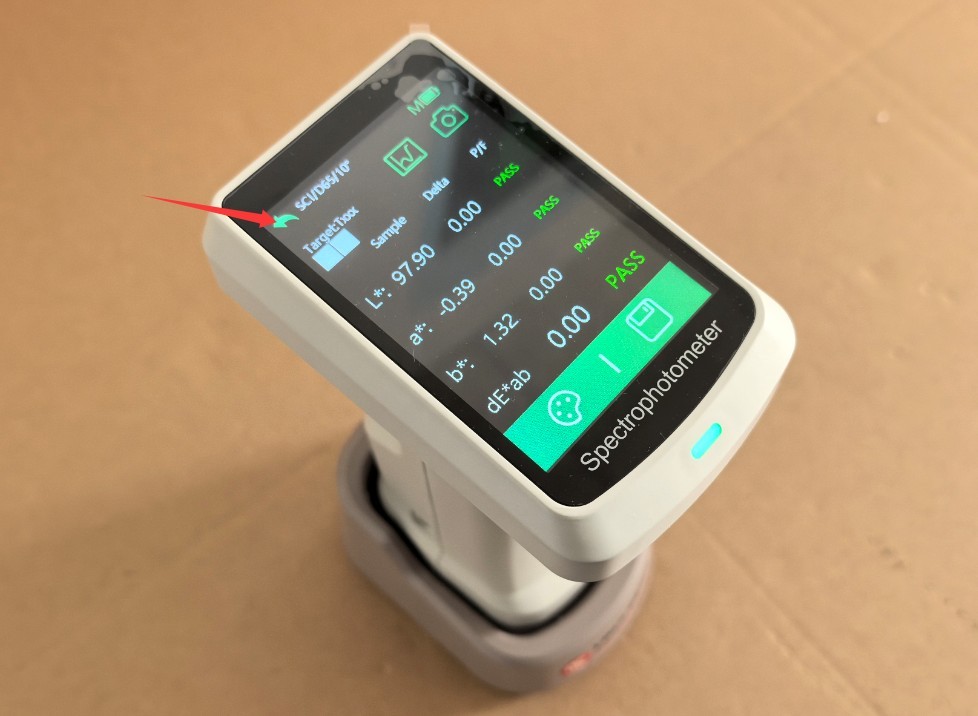
図13
| 数 | お願い |
| ① | 測定インターフェース |
| ② | View more information about the current measurement results |
| ③ | View Saved Color Swatches |
| ④ | パラメータ設定 |
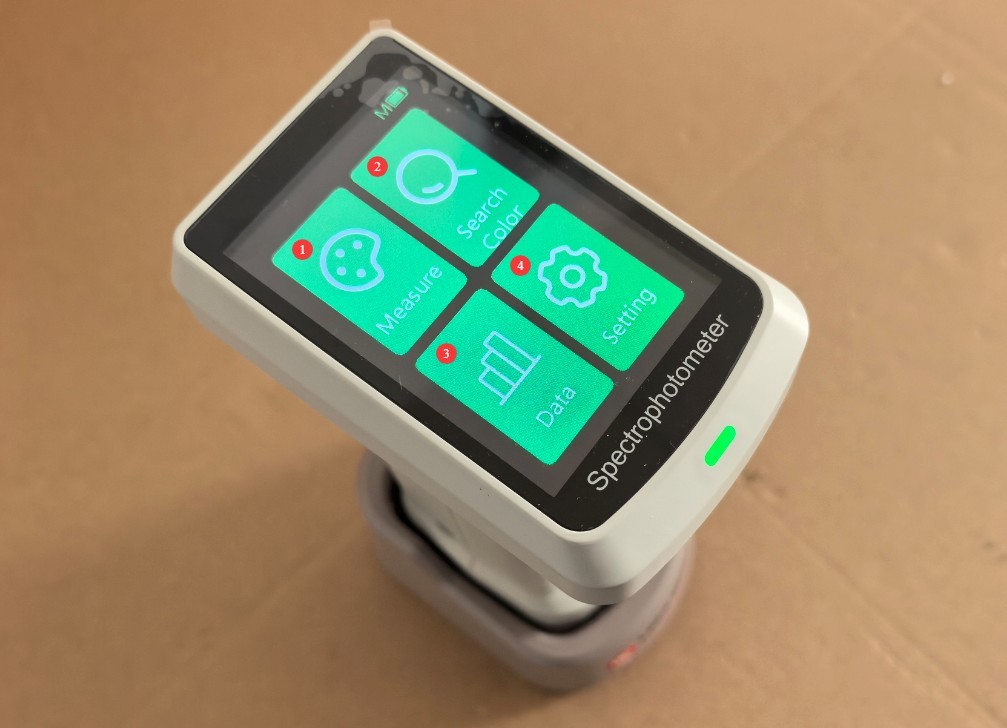
図14
3.4.2 Viewing Saved Color Swatches
You can click to select a color swatch you saved previously.
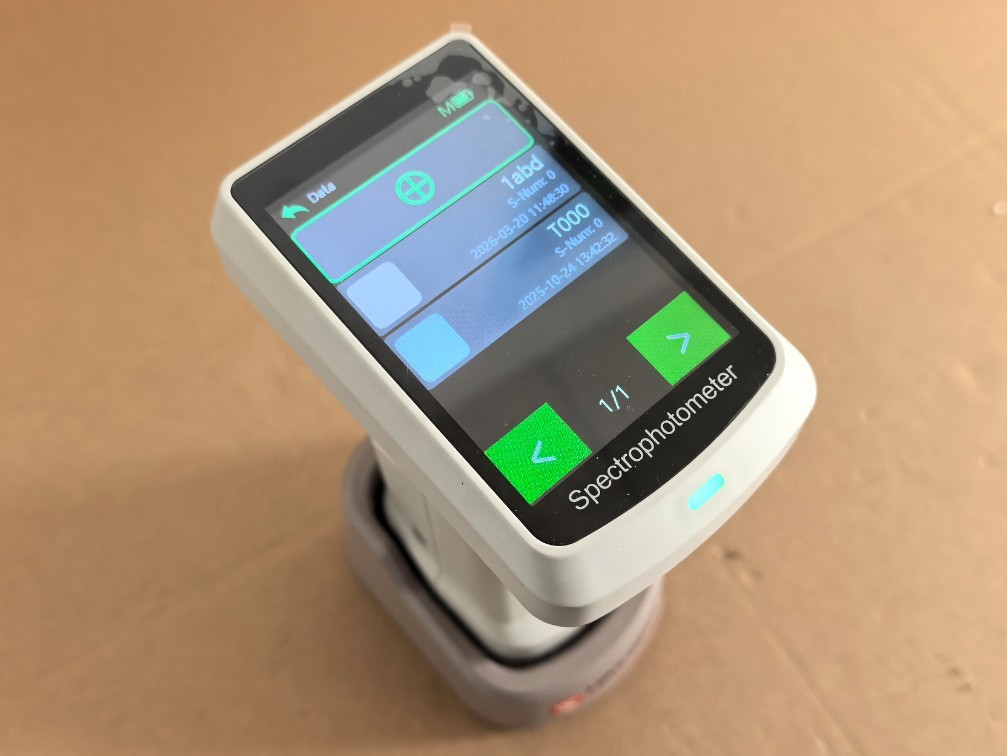
図15
Click to use the current color chart as the reference standard and measure the color difference.
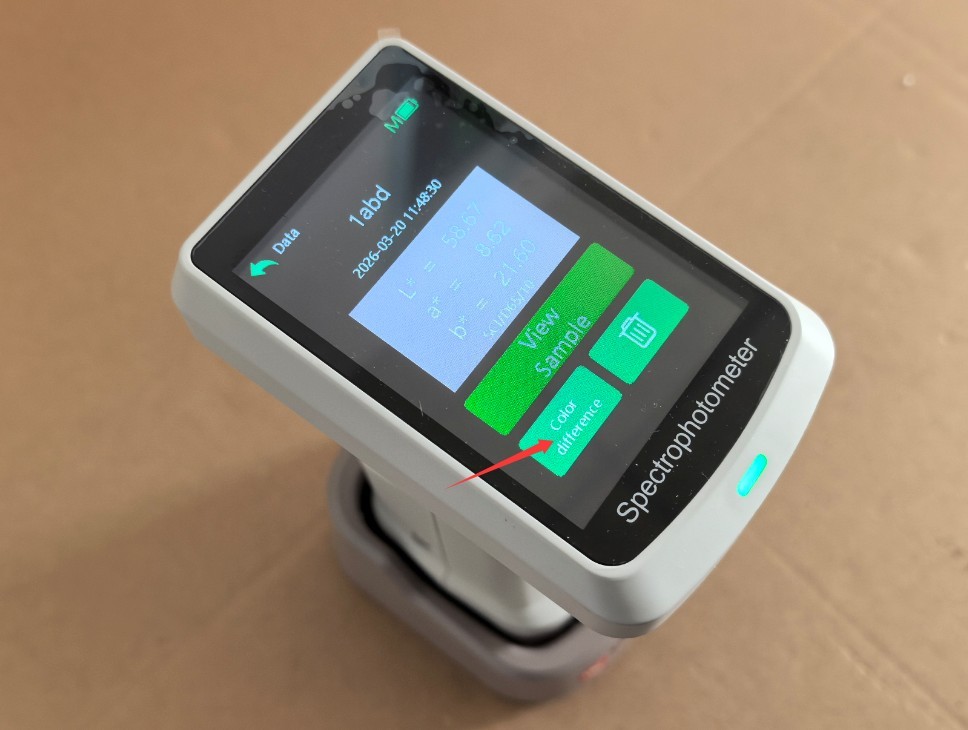
図16
3.4.3 パラメータ設定インターフェース
| 数 | お願い |
| ① | Measurement Parameter Settings |
| ② | 電源設定 |
| ③ | 時間設定 |
| ④ | Display Language Settings |
| ⑤ | キャリブレーション |
| ⑥ | Product Information Screen |
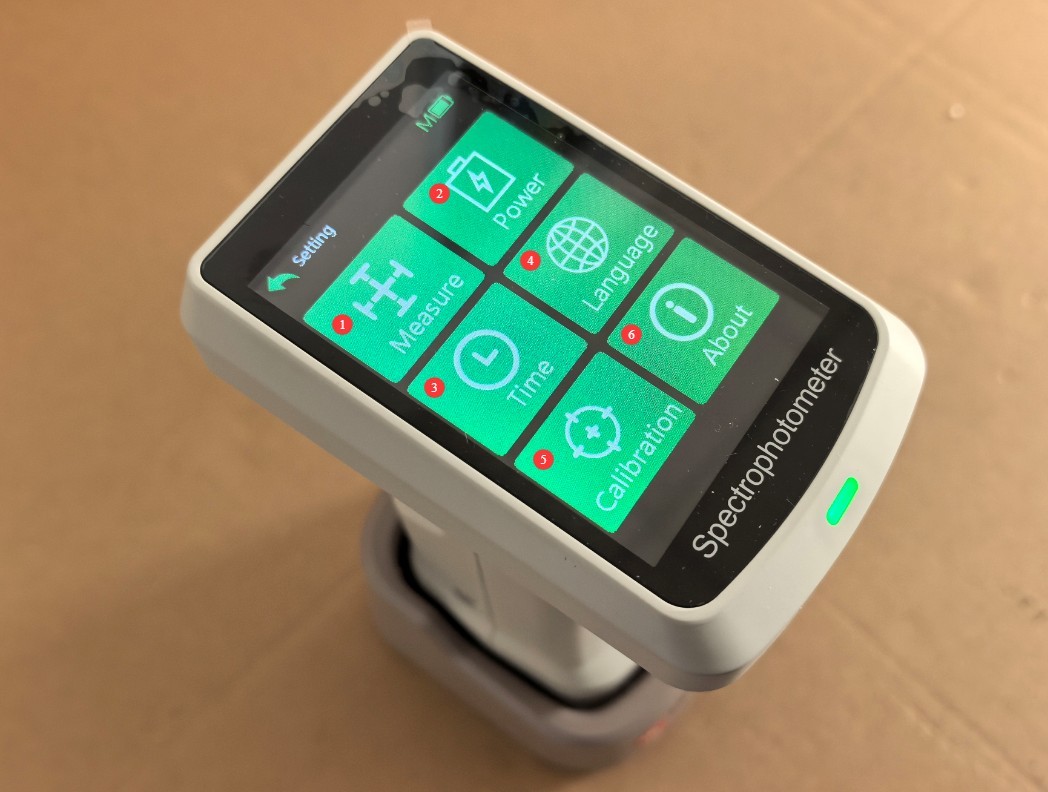
図17
3.4.3.1 Measurement Parameter Settings
You can configure the parameters you want to measure and modify the measurement settings.
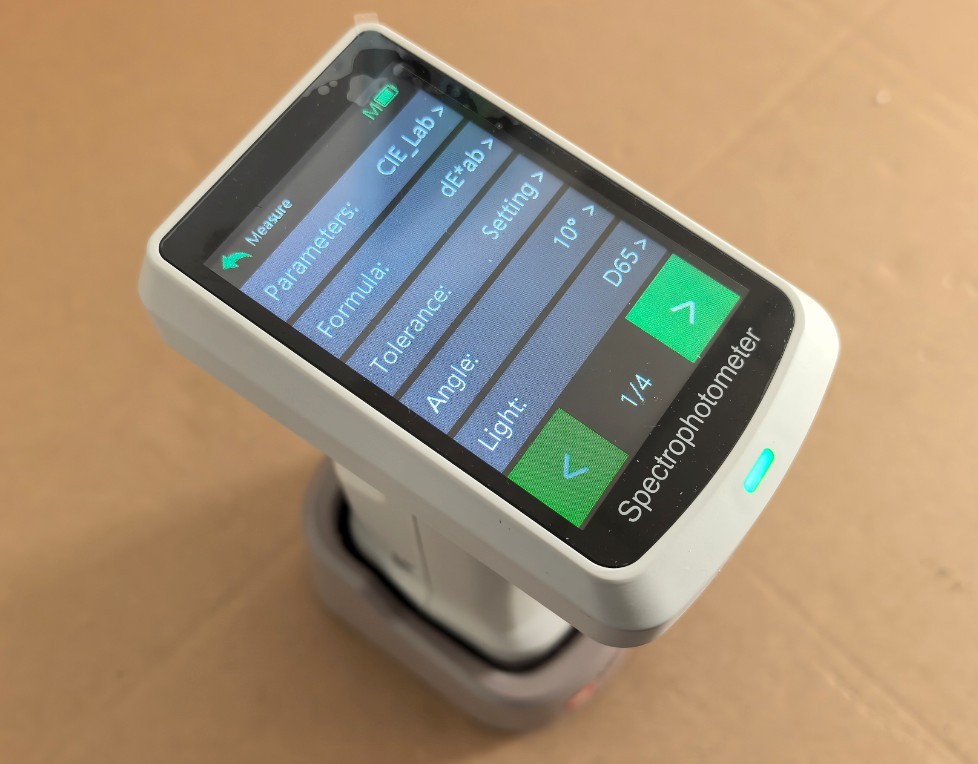
図18
その HSCD-860 can measure dozens of parameters; the default measurement parameter is CIE-Lab.
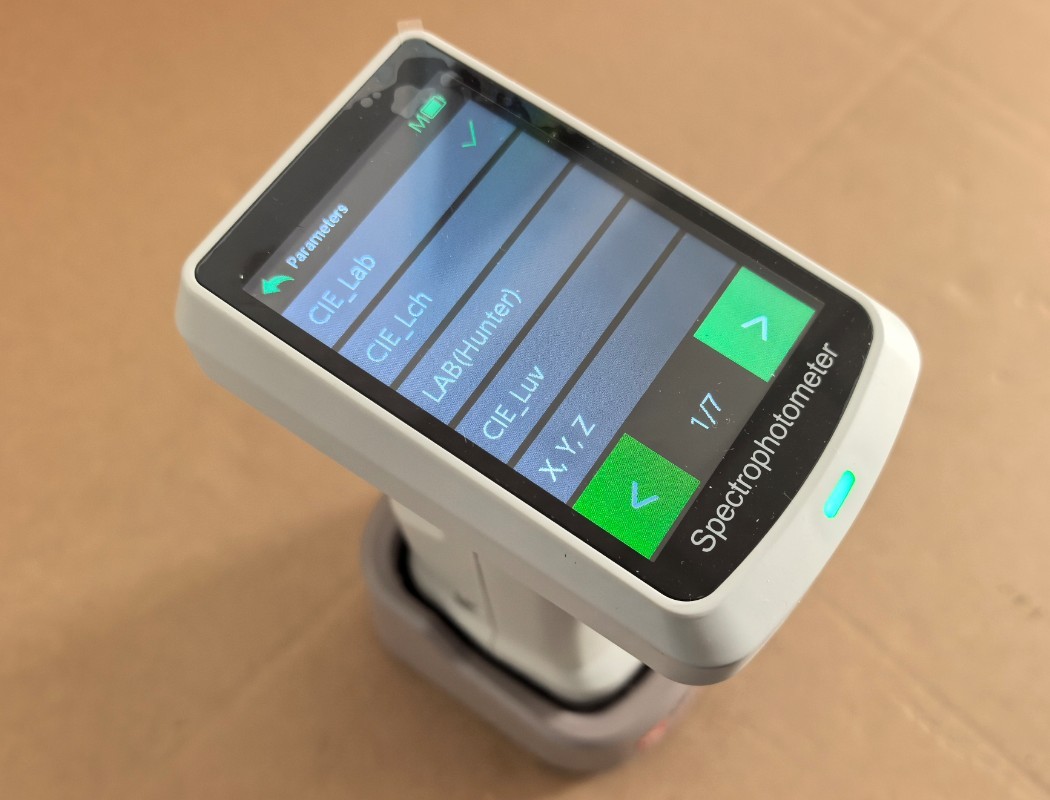
図19
Note: After modifying the measurement parameters, please refer to Section 3.4.3.3 and run the calibration again.
3.4.3.2 Power Supply Parameter Settings
| 数 | お願い |
| ① | Automatic Shutdown Settings |
| ② | Auto-Screen-Off Settings |
| ③ | Bluetooth Switch (Note: You must turn on Bluetooth to connect the device using the mobile app.) |
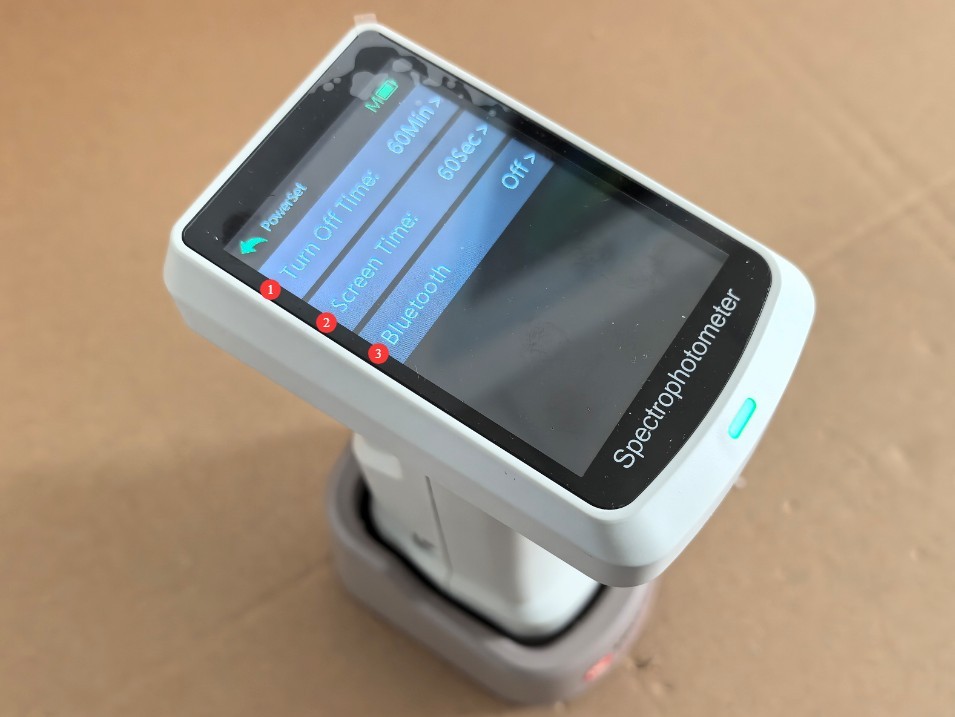
図20
3.4.3.3キャリブレーション
Place the device on the calibration whiteboard base, then tap to enter the calibration interface. The device will automatically perform white calibration; then, follow the instructions in Section 3.1 to perform black calibration.
4. App Operation
4.1オンライン
Follow the instructions below to install the app on your phone.
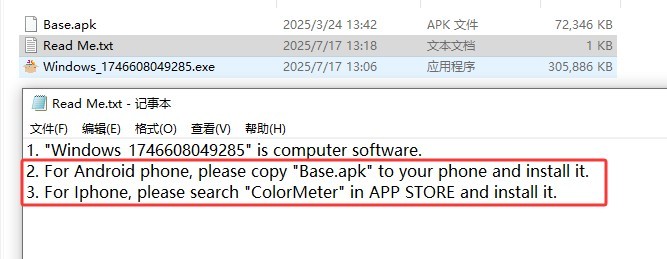
図21
Refer to Section 3.4.3.2 to enable the HSCD-860’s Bluetooth functionality.
アプリを開いて「接続」をタップします。
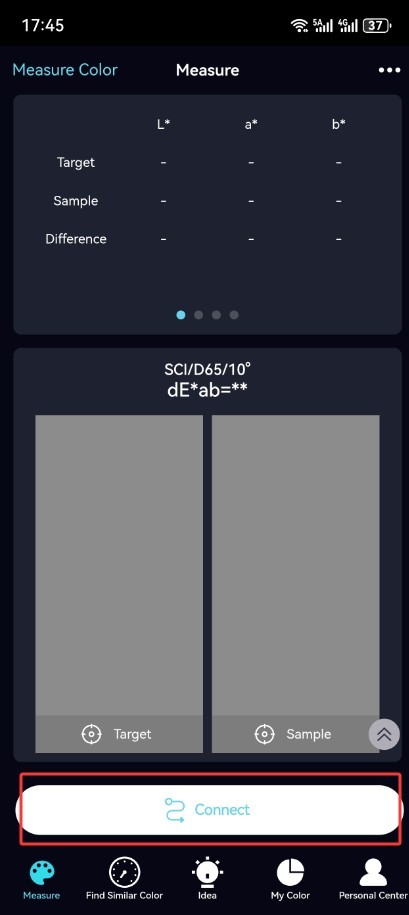
図22
4.2キャリブレーション
If the app prompts you to calibrate, follow the instructions to perform white calibration and black calibration.
4.3 Measurement Procedure
4.3.1 Color Measurement and Color Difference Measurement
| 数 | お願い |
| ① | Click on the left to measure a color or measure a standard sample. |
| ② | Click on the right to measure the color difference of the sample |
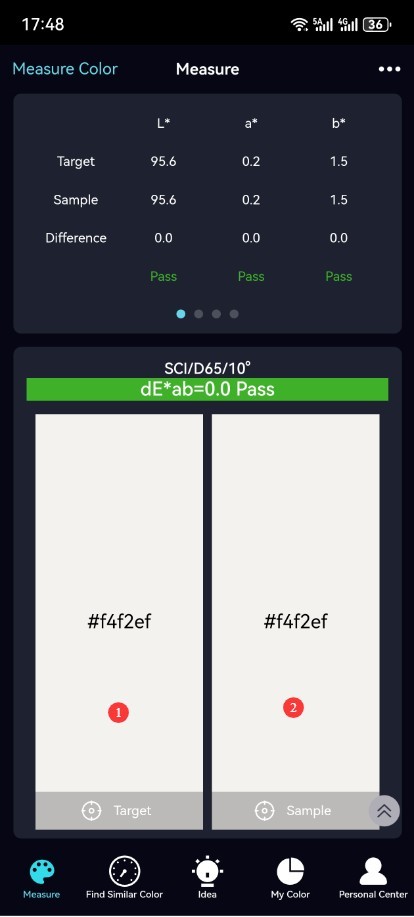
図23
5. ソフトウェアの操作
5.1 接続と校正
Refer to Section 1.3. Connect the HSCD-860 to the computer using the dedicated USB cable, and turn it on. Install the following software on the computer.
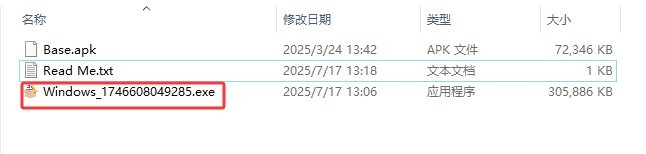
図24
| 数 | お願い |
| ① | This is paid color management software; you don’t have to use it. |
| ② | Double-click to open this software; once it opens, it will automatically connect to the internet. |
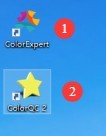
図25
If the software prompts you to perform calibration, follow the on-screen instructions to perform white and black calibration.
5.2 Software Operation
| 数 | お願い |
| ① | Click to measure color (reference sample measurement) |
| ② | Click to measure the color difference of the sample |
| ③ | List of Measurement Results for All Reference Standards |
| ④ | Color difference measurement results for all samples relative to the reference standard |
| ⑤ | You can print and save measurement results; you can create a new measurement interface and open previously saved measurement reports. |
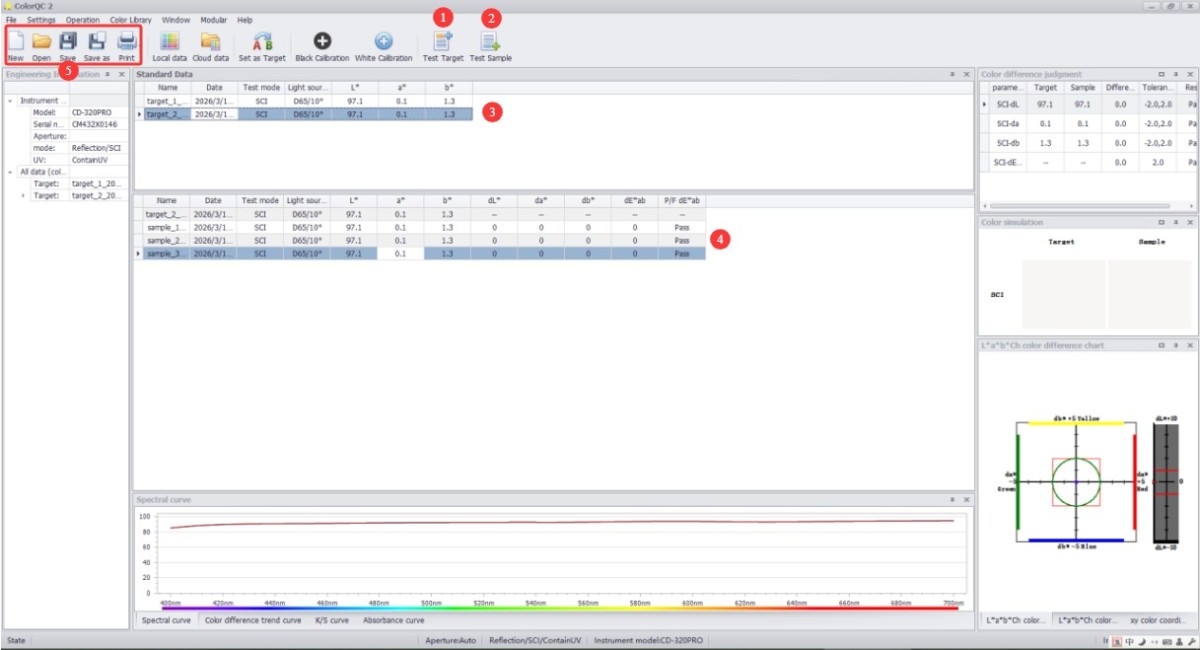
図26
6. 機器の日常的なメンテナンスと手入れ
6.1クリーニングとメンテナンス
6.1.1 Cleaning the Body and Display
Body Surface: Wipe off dust and stains from the body with a clean, soft cloth. For stubborn stains, lightly wipe the area with a small amount of water. Do not use detergents or other corrosive liquids;
Display: Gently wipe the screen with a dedicated screen-cleaning cloth to avoid scratching it. Do not touch the display directly with your fingers. If dust gets on the screen, gently brush it away with a lint-free brush.
6.1.2 Cleaning the Calibration Plate
The calibration plate is a standard accessory; surface wear or stains will affect calibration accuracy: Gently wipe the surface of the calibration plate with a lint-free cloth; if there are stubborn stains on the surface of the calibration plate, contact customer service promptly to have it replaced. Do not sand or repair the calibration plate yourself.
6.2バッテリーのメンテナンス
6.2.1 充電とメンテナンス
Use the USB cable that came with the device. Avoid charging the device in high-temperature environments, and unplug the cable immediately after charging is complete to prevent overcharging. Charge the device promptly when the battery level falls below 15% to avoid deep discharge of the lithium battery, which can shorten its lifespan.
6.2.2 Battery Life Maintenance
The device’s built-in lithium-ion battery is rechargeable; under normal use, a single charge allows for 10000 consecutive measurements;
When the device is not in use for an extended period, ensure the battery charge remains between 50% and 80%. Recharge the battery once every three months to restore the charge to between 50% and 80%, thereby preventing the battery from becoming deeply discharged or swelling;
If the battery shows signs of swelling, leakage, or a significant decrease in battery life, stop using it immediately and contact us for repair.
よくある問題のトラブルシューティングと解決
| 障害症状 | 考えられる原因 | 手順 |
| Unable to Power On | 低バッテリー | Please use the dedicated USB cable to charge the device; if it still won’t turn on after charging, please contact us for repair. |
| Battery life has deteriorated | Battery degradation, excessive ambient temperature | Contact us for repairs; using the device in high-temperature environments causes the battery to drain quickly—please use it in a normal environment. |
| Significant Errors in Measurement Data | Failure to perform white and black calibration promptly and accurately; contamination of the calibration white plate; errors in the measurement of reference standards; contamination of the measurement aperture | Perform white and black calibration correctly; clean or replace the calibration white plate; remeasure the reference samples; clean the inside of the test ports with a lint-free brush; if the test ports show signs of physical damage, please contact us for repair. |