
 英語
英語 中文简体
中文简体 Русский
 Español
 Português
 Türkçe
 العربية
 Deutsch
 Polski
 Italiano
 Français
 한국어
한국어 ไทย
ไทย Tiếng Việt
 日本語
日本語





























Conduits Compression Test Apparatus
ユーザーズマニュアル
適用 LISUN モデル:LS-B50
1. 機器の基本的な理解
1.1 主なパラメータ
1.1.1 機器の技術仕様
| 技術パラメータ | お願い |
| 最大圧力 | 5000 N |
| 圧力精度 | ±1% |
| Specifications for Pressurized Steel Blocks | 50×50 mm |
| Steel Base Dimensions | 300×150 mm |
| リフト範囲 | 20 mm |
1.1.2 適用規格
The LS-B50 Conduits Compression Test Apparatus is designed and manufactured in strict accordance with Clause 10.2 and Figure 1 (IEC 61386-1:2017, Clause 10.2, Figure 1).
1.2 機器構成の検証
1.2.1開梱
デバイスの開梱時には、鋭利な工具などで筐体を傷つけないよう、優しく扱ってください。開梱後、まずデバイスの外観を点検し、目に見える変形やへこみがないか、ボタンが破損または緩んでいないかを確認してください。デバイスまたは付属品に異常が見られる場合は、電源を入れずに直ちにご連絡ください。
1.2.2 本体および付属品
| 数 | お願い |
| ① | LS-B50本体 |
| ② | 電源コード |
1.2.3 電子文書のダウンロード
電子版ユーザーマニュアル、校正証明書、保証書、その他の書類のダウンロードリンクは、出荷時にメールにて既にお送りしております。お早めにダウンロードしてください。メールが届いていない場合は、再度ダウンロードリンクをお送りしますので、弊社までご連絡ください。
2.安全上の注意
2.1 電気安全
Before connecting the power cord, verify that the supply voltage is AC 220 V ±10% and the frequency is 50 Hz or 60 Hz. You must use a three-prong outlet with a protective ground, and the protective ground resistance must be ≤4 Ω. Never cut or disconnect the protective ground wire, as doing so poses a risk of electric shock.
2.2 環境安全
Do not use in environments with flammable or explosive substances, strong electromagnetic interference, high temperatures and humidity, or excessive dust levels. Place the equipment on a level, stable surface, and ensure there is at least 0.5 m of operating space around it. Operating environment: temperature 15°C to 35°C, relative humidity 45% to 75%.
2.3 操作手順
During testing, do not place your hands or any other part of your body within the pressure test area to prevent injuries from being crushed; test specimens must be securely fastened to prevent them from falling and causing safety incidents during testing; it is strictly prohibited to disassemble the equipment’s transmission mechanism or dismantle the machine without authorization.
3. 機器の概要
3.1 標準図
See Figure 3-1 (taken from the IEC standard).
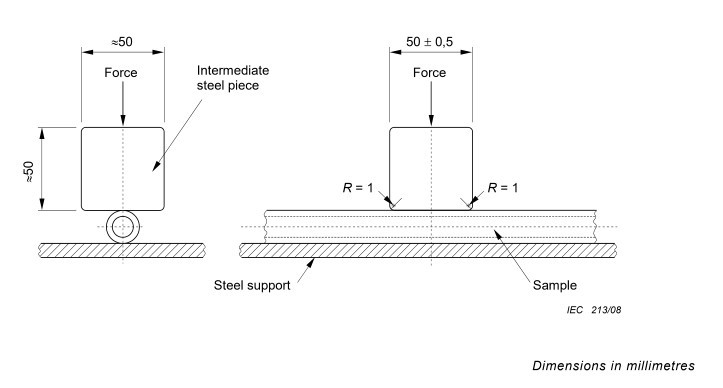
図3-1
製品写真3.2枚
図3-2を参照してください。
| 数 | お願い |
| ① | 電源スイッチ |
| ② | Buzzer; a buzzer sounds when the test is complete. |
| ③ | タッチスクリーン |
| ④ | Pressure block, used to apply pressure to the conduit specimen |
| ⑤ | 圧力センサ |
| ⑥ | スチールベース |
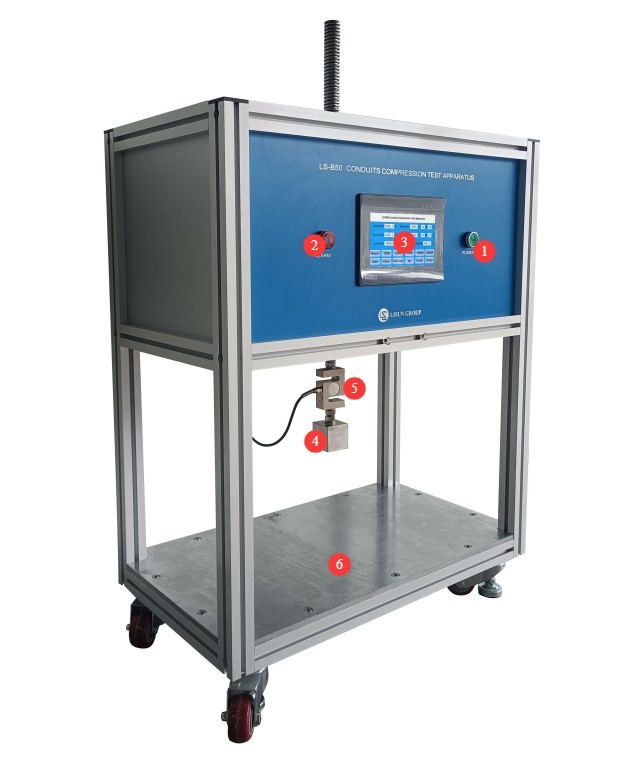
図3-2
4. タッチスクリーンプログラムの概要
4.1 初期画面
図4-1を参照してください。
| 数 | お願い |
| ① | Test Interface, Chinese |
| ② | Test Interface, English |
| ③ | Pressure Calibration Interface, Chinese |
| ④ | Pressure Calibration Interface, English |
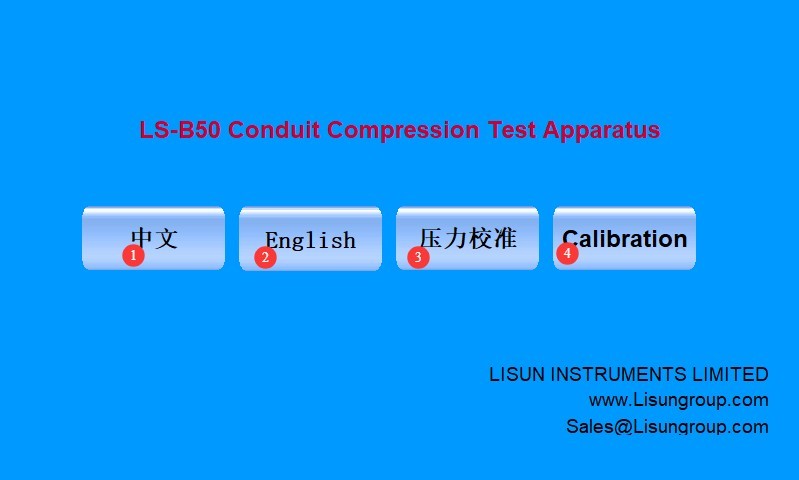
図4-1
Note: The pressure readings have been calibrated before the device left the factory. If you need to recalibrate the pressure during use and have any questions about operating the calibration interface, please contact us.
4.2 Test Interface
図4-2を参照してください。
| 数 | お願い |
| ① | To preset the load pressure value, click the ⑧ Pressure Value button. Do not set non-standard pressure values on your own. |
| ② | Set the test duration; according to the standard, it should be set to 60 seconds. |
| ③ | Current Load Pressure Value |
| ④ | Current Test Duration |
| ⑤ | Number of loading pulses, preset according to different pressure values |
| ⑥ | Time from 0 to the preset pressure value |
| ⑦ | Reset, Release Pressure |
| ⑧ | Pressure values for different catheters—simply click to preset them |
| ⑨ | テストの開始/停止 |
| ⑩ | Reset: Clear the data from the last test and clear the beep alarm. |
| ⑪ | Reset the pressure value; set the current force value to 0 |
| ⑫ | Up—click to raise the steel block |
| ⑬ | Drop; click to lower the steel block |
| ⑭ | ホーム画面に戻る |
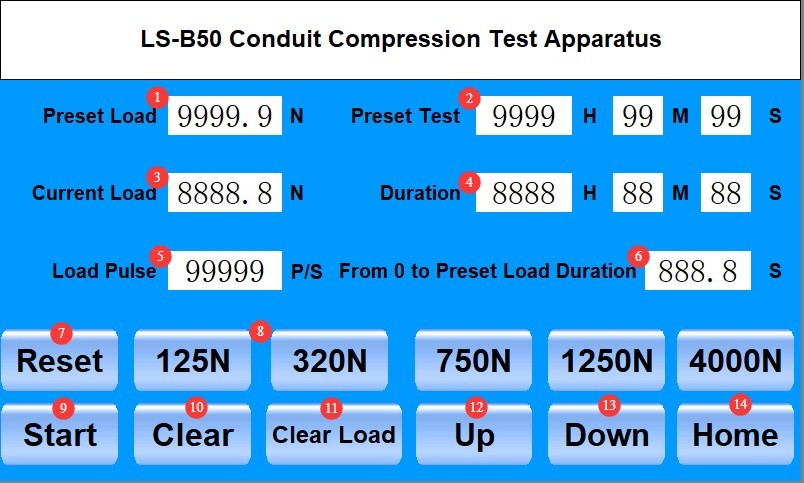
図4-2
5. Pressure Testing of Electrical Conduits
5.1準備
5.1.1 Preparation of Test Specimens
Cut a test specimen from the conduit with a length of (200±5) mm. Maintain the test environment temperature at (23±2) °C. Before the test, measure the outer diameter of the conduit specimen.
5.1.2 Determination of Pressure Values
| 分類コード | カテーテルの種類 | Pressure N (tolerance ±4%) |
| 1 | 超軽量 | 125 |
| 2 | 光 | 320 |
| 3 | 中国語 | 750 |
| 4 | ヘビー | 1250 |
| 5 | 太り過ぎ | 4000 |
5.1.3 Positioning of Test Specimens and Equipment
Place the pipe specimen on the steel base, click “Up/Down” to move the steel block toward the pipe specimen. Stop just before contact is made, then click to reset the pressure reading to zero.
5.2 Pressure Test Procedures
5.2.1 Normal Test Procedure
Set the test duration to 60 seconds. Refer to Section 5.1.2, click the button for the desired pressure value to preset the pressure value and loading pulse, and then click “Start” to begin the test.
After the test begins, the steel block slowly applies pressure to the guide tube. When the pressure value begins to change, the timer starts counting the time from 0 until the preset pressure value is reached. When the current pressure value reaches the preset pressure value, the timer stops counting the time from 0 until the preset pressure value is reached, and the timer begins counting the current test duration.
When the current test duration reaches the preset test duration, the device sounds an alarm, but the current pressure value remains at the preset pressure value. According to the standard, after the test is complete, the outer diameter of the specimen at the flattened section must be measured without relieving the pressure. The difference between the original outer diameter and the outer diameter of the specimen after flattening must not exceed 25% of the original outer diameter measured before the test.
Click “Reset” to release the pressure and return the steel block to its initial position. After (60±2) seconds, measure the outer diameter of the flattened portion of the specimen again. The difference between the original outer diameter and the outer diameter of the flattened specimen must not exceed 10% of the outer diameter measured before the test.
After the test, the test specimen must not exhibit any cracks visible to the naked eye or with corrected vision without any additional magnification.
5.2.2 Debugging Load Pulses
Depending on the catheter’s compressive strength, the preset loading pulses may require adjustment. During normal testing, if the timer stops while the load is being applied from 0 to the preset pressure value and the duration is not within the range of (30±3) seconds, the number of loading pulses must be adjusted.
Taking 4000 N as an example, the corresponding preset number of loading pulses is 2700. If the actual loading duration is 25 seconds, which is less than the standard requirement of (30±3) seconds, you can change the number of loading pulses from 2700 to 2600 and try again; If the actual loading duration is 35 seconds—which exceeds the standard requirement of (30 ± 3) seconds—then try changing the number of loading pulses from 2700 to 2800. Continue adjusting until the loading duration meets the standard requirement.
6. 機器の日常的なメンテナンスと手入れ
6.1 シャットダウン後の日常メンテナンス
At the end of each day’s testing, clean dust and specimen debris from the equipment surfaces, and keep the steel blocks and steel bases clean and free of debris; use a special touchscreen cleaning cloth to clean the touchscreen; check the pressure-applied steel blocks for deformation or displacement.
6.2 週ごとの定期メンテナンス
Apply a small amount of special-purpose lubricating grease to the equipment’s drive lead screw to ensure smooth, jam-free operation.
6.3 長期保管中のメンテナンス
After the equipment has been powered off and routine maintenance has been completed, cover the entire unit with a dust cover and store it in a dry, well-ventilated warehouse; power it on for 30 minutes each month to prevent components from being damaged by moisture.
6.4 校正間隔の要件
機器の測定精度と動作信頼性を確保するため、定期的に認定された第三者計測機関に送付して校正を受けることを推奨します。推奨される校正間隔は12ヶ月です。具体的な校正間隔は、使用頻度、環境条件、および品質システム要件に基づいてユーザーが決定できます。
7.よくある問題のトラブルシューティングと解決
| 障害症状 | 考えられる原因 | 手順 |
| Touchscreen lags; taps don’t register | Screen surface smudges causing interference, program crashes | Turn off the device, clean the screen, then restart it and try again. |
| No pressure reading is displayed for an extended period after the test starts | The specimen guide tube was not positioned beneath the steel block, and the steel block was too far from the specimen guide tube. | Reposition the specimen guide tube; use the down arrow key to move the steel block closer to the specimen guide tube, then try again. |
| The load time is not within the (30±3)s range. | Since catheters have different compressive strength, the preset loading pulses may need to be adjusted. | Follow the instructions in Section 5.2.2 for debugging. |
| Pressure Drift | After the equipment has been in use for a long time, it is important to calibrate the force readings. | We recommend having the equipment calibrated by a third-party metrology organization. You can adjust the pressure reading by accessing the calibration screen. |