
 英語
英語 中文简体
中文简体 Русский
 Español
 Português
 Türkçe
 العربية
 Deutsch
 Polski
 Italiano
 Français
 한국어
한국어 ไทย
ไทย Tiếng Việt
 日本語
日本語





























輝度比色計
ユーザーズマニュアル
適用 LISUN モデル: XYL-VI
1. 機器の基本的な理解
1.1 設備概要
1.1.1 主なパラメータ
| 技術パラメータ | お願い |
|---|---|
| Spectral Sensitivity of the Digital V (λ) Sensor | f1 < ±5.5% |
| Dynamic Range of Luminance Measurement | 10~1000,000 cd/m² |
| Accuracy and Resolution of Brightness Measurement | <±5%; 0.01 cd/m² |
| Relative Color Temperature (Tc) Dynamic Range | 1350K–25000K; brightness must be >10 cd/m² |
| Color Temperature Measurement Accuracy and Resolution | ±20K (CIE Standard A light source, 100 cd/m²); 1K |
| 色座標 | x, y, u, v(u’, v’), with luminance greater than 10 cd/m² |
| Color Coordinate Accuracy and Repeatability | ±0.002 (under CIE Standard A illuminant, 100 cd/m²); ±0.0005 (under CIE Standard A illuminant) |
| Measuring the Field of View Angle | 1° |
| 距離を測定 | 0.7メートルから無限大 |
| リフレッシュレート | When brightness is ≥10 cd/m², once per second; when brightness is <10 cd/m², once every 3 seconds |
| ディスプレイ表示 | 128×64 グラフィック LCD ディスプレイ |
| 通信インタフェース | RS-232シリアルインターフェース |
| 電源方式 | 9V battery / 6V DC adapter |
| 寸法 | 270 mm (length) × 95 mm (width) × 225 mm (height) (with handle) |
1.1.2 Equipment Applications
その XYL-VI Luminance Colorimeter is a fully digital photometric and colorimetric measurement device that utilizes digital X (λ), Y (λ), and Z (λ) sensors, fundamentally resolving the unavoidable zero-point drift issue inherent in traditional analog luminance meters. Equipped with computer software that supports real-time monitoring, it is suitable for the precise measurement of parameters such as luminance, chromaticity coordinates, and color temperature for various light sources and display products.
Applications: Measurement of photometric and colorimetric parameters for various lighting products, such as LED fixtures, fluorescent lamps, and incandescent lamps; testing of brightness and color uniformity for display devices, such as displays and backlight modules; colorimetric and luminance calibration of light sources such as traffic signals and automotive headlights; light source R& D and quality spot-checks in laboratories and quality inspection departments; rapid measurement of luminance and color temperature in on-site lighting environments.
1.2 構成の検証
1.2.1 開梱と目視検査
When unpacking the device, handle it gently to avoid scratching the casing with sharp tools. After unpacking, first inspect the exterior of the device to ensure there is no obvious deformation or dents, and that the buttons are not damaged or loose. If you notice any abnormalities with the device or its accessories, please contact us immediately.
1.2.2 Main Unit and Accessories
| 数 | お願い |
|---|---|
| ① | ポータブル収納ボックス |
| ② | XYL-VI 輝度比色計 |
| ③ | 電源アダプタ |
| ④ | RS-232 Communication Cable |
| ⑤ | 三脚 |
1.2.3 Downloading Electronic Documents
Download links for the digital user manual, software, warranty card, and other materials have been sent via email. Please download them as soon as possible. If you missed the email, please feel free to contact us to receive the download links again.
2.使用上の注意
2.1 安全ガイドライン
To power the device, use the included 6V DC adapter or a 9V battery with matching specifications. Do not use power sources with incompatible voltages to avoid damaging the device’s internal circuitry.
This equipment is a precision optoelectronic instrument. Do not drop it, subject it to impact, or expose it to severe vibration, as this may cause misalignment of the optical system or damage to the sensors.
Do not disassemble the device yourself; doing so will void the warranty and may cause irreversible damage to the device.
Do not point the device’s objective lens at ultra-bright light sources, such as high-power lasers or the sun, to prevent damage to the internal photosensitive sensors.
2.2 Measurement Environment Requirements
It is recommended that the ambient temperature be within the range of 0–40°C, with relative humidity not exceeding 85% and no condensation. For every 1°C change in temperature, the measured value will deviate by –0.1%; to ensure high-precision measurements, the ambient temperature must remain stable.
Avoid using the device in environments with strong electromagnetic interference, such as near high-power motors or high-frequency transmitting equipment, to prevent abnormal fluctuations in measurement data.
The device must be placed on a stable surface or tripod; avoid shaking it during measurement to ensure the aiming position remains steady.
2.3 Contraindications for Use
Do not touch the optical surfaces of the objective and eyepiece lenses directly with your hands to avoid leaving fingerprints or smudges that could affect optical performance.
Do not plug in or unplug the RS232 communication cable while the device is powered on to prevent damage to the interface circuitry.
Do not continue to use the device if the battery is leaking. If you notice any abnormalities with the battery, remove it immediately and clean the battery compartment.
Do not use corrosive cleaning agents to wipe down the equipment housing or optical lenses.
3. 機器の概要
3.1 Front of the Device
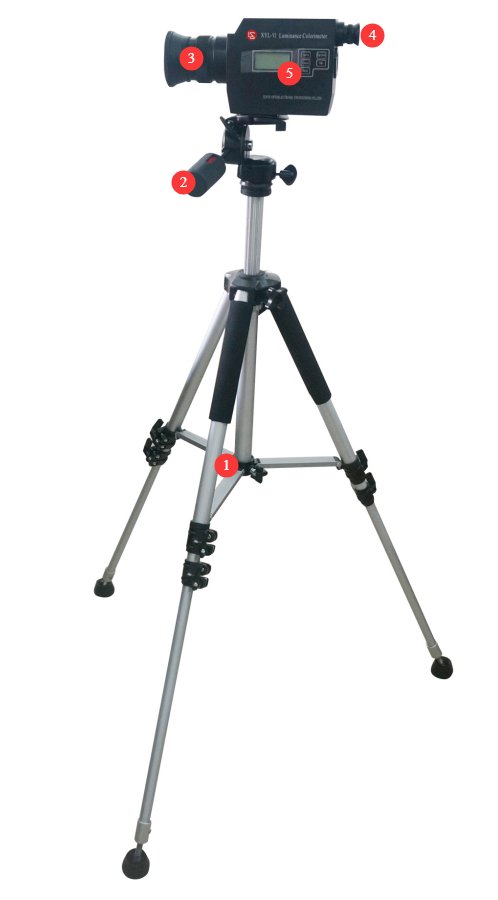
See Figure 3-1 for the overall structure of the XYL-VI.
| 数 | お願い |
|---|---|
| ① Tripod | The device includes a handle, which can be replaced with a tripod; the tripod is height-adjustable. |
| ② Handle | Allows you to control the aiming direction |
| ③ Objective Lens | Used to converge light rays onto the target under test; it serves as the incident end of the optical measurement system. |
| ④ Eyepiece | Aim at the target while observing; rotate to adjust the focus |
| ⑤ Display and Buttons | Displays test results; use the buttons to navigate through pages and lock test results, etc. |
3.2 Back of the Device
| 数 | お願い |
|---|---|
| ① | Power Adapter Jack |
| ② | RS-232通信インターフェース |
| ③ | 電源スイッチ |
4. Equipment Operation and Use
4.1 Preparations Before Power-Up
4.1.1 Selection of Power Supply Method
The device supports two power options; you can choose either one: battery power or power adapter.
4.1.2 Tripod Mounting (Optional)
When measuring stationary targets, we recommend using a tripod to improve measurement stability: Turn the mounting screw at the bottom of the handgrip counterclockwise to remove the handgrip; align the screw hole on the bottom of the device with the mounting screw on the tripod head, then tighten it clockwise to secure the device, ensuring it is stable and wobble-free.
4.2 Adjustment of the Optical Sighting System
Optical alignment must be completed before formal measurements begin to ensure that the measurement area is precisely aligned with the target.
4.2.1 Eyepiece Focus Adjustment
Turn on the device and point the objective lens toward a uniformly lit surface (avoid pointing it at a strong light source). Slowly rotate the eyepiece ring until the edges of the black spot in the field of view appear clear and sharp, with no blurring or ghosting, to complete the diopter adjustment.
4.2.2 Focusing the Objective Lens and Aiming at the Target
Align the device’s objective lens with the target to be measured, and observe the object through the eyepiece; slowly turn the objective lens focus ring until the image of the target in the eyepiece is clear; move the device to align the black spot at the center of the field of view with the target area to be measured, thereby completing the aiming and positioning.
4.3 Basic Measurement Operations on the Host Computer
4.3.1 Powering On and Viewing Basic Parameters
Observe the measurement parameters on the display screen. Press the “Previous Page” and “Next Page” buttons to cycle through and view the following measurement parameters: Luminance Y, Correlated Color Temperature Tc, Chromaticity Coordinates (x, y), Chromaticity Coordinates (u, v) or (u’, v’), difference parameters (Δu, Δv, Δx, Δy, ΔTc) or (Δu’, Δv’, Δx, Δy, ΔTc). If the measured color temperature exceeds the range of 1350 K to 25000 K, the device will display 0 K, indicating that it is within the normal measurement range.
4.3.2 Using the Data Retention Feature
During measurement, press the “Hold” button to lock all measurement values currently displayed on the screen; the screen will stop updating. Press the “Hold” button again to unlock the screen and resume real-time measurement updates.
4.3.3 Reference Source Settings and Differential Measurements
After setting the reference source, you can view the difference between the current measurement and the reference value in real time, making it suitable for comparative testing of products within the same batch.
| 説明書 | お願い |
|---|---|
| Set the Reference Source | On the measurement screen, press “Confirm” to enter the main menu, select the “Set Reference Source” option, and press “Confirm” to proceed. The screen will display the current Tc, Y, and color coordinate values, along with the corresponding light source channel number. After verifying that the values are correct, press “Confirm” to save the current values as the reference source and return to the measurement screen. If you do not need to save, press “Cancel” to exit directly. |
| View the difference | After setting the reference source, use the “Previous Page” and “Next Page” buttons to navigate to the difference display page, where you can view the absolute differences (Δu, Δv, Δx, Δy, ΔTc) between the current measurement values and the reference source. |
| Browse Reference Sources | Go to the main menu and select “View Reference Source” to view all parameters of the currently saved reference source. After viewing, press “Confirm” or “Cancel” to exit. |
4.3.4 Switching Display Modes (uv/u’v’)
The device supports two color space display modes, which can be switched as needed.
On the measurement screen, press “Confirm” to enter the main menu, select the “Set Display Value” option, and press “Confirm” to proceed. Use the “Previous Page” and “Next Page” buttons to select “uv mode” or “u’v’ mode”: (u, v) corresponds to color coordinates in the CIE 1960 uniform chromaticity diagram, while (u’, v’) corresponds to color coordinates in the CIE 1976 uniform color space.
After making your selection, press “Confirm” to save the settings and return; press “Cancel” to exit without saving.
4.3.5 Screen Contrast Adjustment
On the measurement screen, press “Confirm” to enter the main menu. Select the “Adjust Contrast” option, then press “Confirm” to enter. Use the “Previous Page” and “Next Page” buttons to adjust the contrast level, which ranges from 0 to 7; the higher the value, the brighter the screen.
Once you’ve adjusted the settings to your liking, press “Confirm” to save and exit.
4.4 Online Software Operation Procedure
4.4.1 Device Connection and Communication Settings
使用する RS232 cable to connect the RS232 port on the back of the device to the computer’s serial port (if using a USB-to-serial adapter, you’ll need to install the appropriate driver).
Turn on the device and launch the corresponding software on your computer.
Click “Run” → “Com Option” in the software menu bar, select the COM port number corresponding to the device in the pop-up window, and click “OK” to establish the communication connection.
4.4.2 Measurement Parameter Presets
Click “Run” → “Parameter” in the software menu bar to open the parameter settings window, as shown in Figure 5-1.
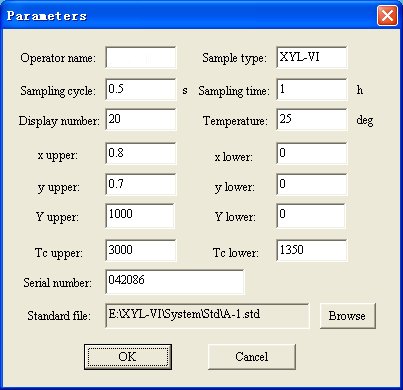
Enter the operator’s name, sample type, instrument serial number, and ambient temperature in that order; set the sampling interval (the time between two samples) and the total sampling duration; sampling will automatically stop once the set duration is reached; Set the upper and lower limits for the x and y color coordinates, luminance Y, and color temperature Tc to define the display range of the data curve; manually select the corresponding standard light source file—A-1.std (CIE Standard A light source) is selected by default; once all parameters are set, click “OK” to save the settings.
4.4.3 Real-Time Sampling and Data Viewing
After configuring the parameters, click the “Start” button on the software interface. The device will begin continuous sampling, and the interface will display the measurement data and chromaticity coordinate graphs in real time, as shown in Figure 5-2.
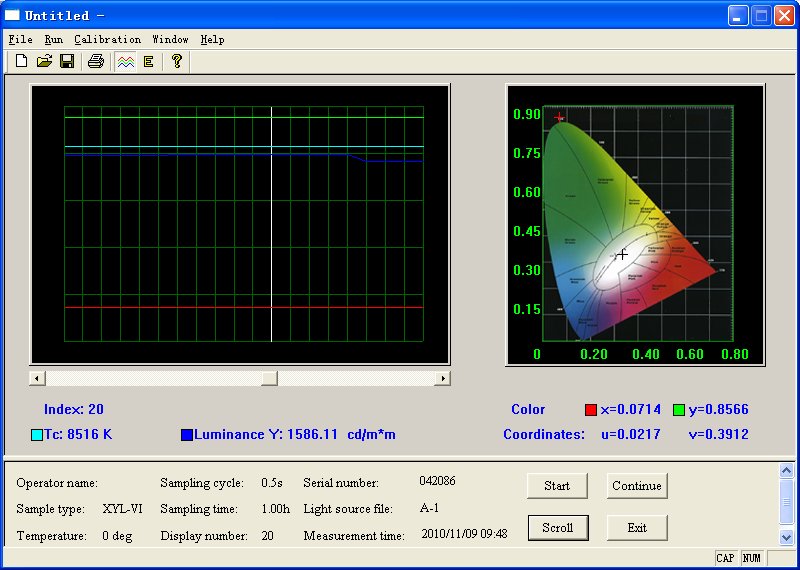
During sampling, you can click “Pause” to pause sampling and click “Continue” to resume sampling.
After sampling is complete, click the “View/Scroll” button to switch viewing modes and scroll through the data for all historical sampling points.
Once sampling is complete, use the “Save” option in the “File” menu to save the data file, or select “Export” to export it as an Excel spreadsheet.
4.4.4 Parameter Self-Test and Synchronization
Click “Calibration” → “Self-check” in the software menu bar, and the software will automatically verify that the calibration parameters on the computer and the device match.
If the parameters match, a prompt window will appear; simply click “OK.”
If the parameters do not match, click “Yes” after the prompt appears to select a synchronization method:
Upload Parameters: Upload and back up the parameters from the device to your computer.
Download Parameters: Write the standard parameters from the computer to the device, overwriting the existing ones.
Parameter synchronization is irreversible; please ensure you have backed up your data before proceeding.
5. Daily Maintenance and Care of Equipment
5.1 Daily Cleaning and Storage
Cleaning the Unit: After daily use, wipe dust from the surface of the unit with a clean, soft, dry cloth. If there are stains, gently wipe them with a soft cloth dampened with a small amount of clean water. Do not use corrosive solvents such as alcohol or gasoline.
Cleaning Optical Lenses: If the surfaces of the objective or eyepiece lenses are dirty, gently wipe them with special lens-cleaning paper or a lens-cleaning pen. Do not use regular paper towels or clothing to wipe them, to avoid scratching the lenses. Do not blow directly onto the lenses to prevent saliva residue.
For routine storage, keep the product in a dry, well-ventilated, and dust-free environment, and avoid high temperatures, humidity, and direct sunlight.
5.2 長期保管およびメンテナンス
If the device will not be used for an extended period (more than one month), remove the batteries from the battery compartment to prevent battery leakage from corroding the internal circuitry.
After cleaning the equipment, place it in its original packaging and store it in a dry, cool place, taking care to avoid stacking heavy objects on top of it.
When using the device for the first time after a long period of storage, first inspect the exterior and ensure the optical lenses are undamaged. Only proceed with measurements after powering on the device and verifying that all functions are working properly.
5.3 Battery Use and Maintenance
When the “lobat” low-battery warning appears on the screen, replace the battery promptly to prevent battery leakage.
For long-term use, we recommend using alkaline batteries and avoiding low-quality batteries; be sure to remove the batteries if the device will not be used for an extended period.
When powered by an external adapter, there is no need to remove the battery; the device will prioritize the external power source.
5.4 Calibration Interval Requirements
To ensure the instrument’s measurement accuracy and operational reliability, it is recommended that it be sent periodically to a qualified third-party metrology laboratory for calibration. The recommended calibration interval is 12 months. Users may determine the specific calibration interval based on frequency of use, environmental conditions, and quality system requirements.
6.よくある問題のトラブルシューティングと解決
6.1 Power-On and Power Supply Faults
| 障害症状 | 考えられる原因 | Troubleshooting and Resolution Methods |
|---|---|---|
| The device does not turn on when the power button is pressed, and the screen remains blank. | 1. The battery is dead . 2. The battery terminals are reversed . 3. The adapter is not plugged in properly or is damaged . 4. The power switch has a loose connection. |
1. Replace the battery with a new 9V battery and test it . 2. Open the battery compartment, check the positive and negative terminals, and reinstall the battery. 3. Check that the adapter plug is connected to a power outlet, replace the adapter, and test it . 4. If the device still does not turn on after repeatedly toggling the power switch several times, contact customer service. |
| The computer shuts down automatically shortly after turning on. | 1。 ロー battery power 2. Poor battery contact |
1。 テスト after replacing the battery 2. Remove the battery, wipe the metal contacts, and reinstall it |
| The screen displays “lobat” | Battery level is too low | Replace the batteries promptly, or switch to power from the adapter. |
6.2 Measurement and Display-Related Faults
| 障害症状 | 考えられる原因 | Troubleshooting and Resolution Methods |
|---|---|---|
| The measurement value has remained at 0 and has not changed. | 1. The objective lens cover has not been removed . 2. The brightness of the target is below the minimum measurable level . 3. The aiming position is off-center from the target. |
1. Remove the objective lens cover . 2. Verify that the brightness of the light source being measured is ≥10 cd/m². 3. Readjust the optical alignment to ensure that the dark spot is aligned with the illuminated area. |
| The color temperature is displayed as 0K | The color temperature of the light source under test exceeds the measurement range of 1350 K to 25000 K. | This is a “within normal range” notification; this device cannot measure color temperature values outside this range. |
| Severe fluctuations in the readings; unstable | 1. Fluctuations in the brightness of the light source being measured 2. Interference from ambient stray light 3. The device is not secured and is being held and moved |
1. Ensure the light source has a stable power supply to rule out any issues with the light source itself. 2. Block out ambient stray light and take measurements in a darkroom. 3. Mount the device on a tripod to avoid camera shake caused by holding it by hand. |
| The field of view through the eyepiece is blurry, and I can’t see the target clearly. | 1. The eyepiece is not adjusted for sharpness . 2. The objective lens is not in focus . 3. The optical lenses are dirty. |
1. Rotate the eyepiece to readjust the focus . 2. Turn the objective lens focus ring to focus on the specimen . 3. Clean the eyepiece and objective lens elements with lens paper. |
| The screen is blurry and has poor contrast. | Incorrect screen contrast settings | Go to the menu and adjust the screen contrast to a suitable level. |
6.3 Online Communication Faults
| 障害症状 | 考えられる原因 | Troubleshooting and Resolution Methods |
|---|---|---|
| The software cannot connect to the device | 1。 ザ RS232 cable is not connected properly . 2. The wrong COM port was selected. 3. The device is not turned on . 4. The USB-to-serial driver is not installed. |
1. Check the communication cable connections at both ends and try unplugging and replugging them. 2 . Verify that the correct COM port number is selected in Device Manager on your computer. 3. Turn on the device before connecting it to the software . 4. Install the appropriate USB-to-serial driver. |
| Connection lost during sampling; data stopped updating | 1. ゆるい communication cable 2. Device powered off 3. Serial port occupied by another program |
1. Secure the communication cable to prevent it from being pulled . 2. Check the device’s power status and replace the battery or adapter . 3. Close any other software using the serial port, then reconnect. |
6.4 Measurement Accuracy Anomalies
| 障害症状 | 考えられる原因 | Troubleshooting and Resolution Methods |
|---|---|---|
| Measurement values are highly variable and inaccurate | 1. The spectral calibration file for the corresponding light source was not selected. 2. The device is overdue for calibration . 3. Ambient temperature fluctuations are too extreme . 4. The targeting area is incorrect. |
1. Select the calibration light source that matches the light source under test from the menu. 2 . Contact the manufacturer to perform calibration . 3. Perform measurements in a temperature-stable environment to avoid excessive temperature fluctuations. 4. Realign the instrument to ensure the black spot is perfectly aligned with the area of the light source under test. |
| Inconsistent results from multiple measurements of the same sample | 1. The light source has not stabilized . 2. The measurement position is off . 3. The device has not yet stabilized its readings. |
1. Wait until the light source has warmed up and stabilized before taking measurements . 2. Use a tripod to secure the equipment to ensure consistent measurement positions. 3. Wait until the readings have stabilized before recording the data. |
| No data for differential measurement | No reference source has been set. | Follow the steps to set up the reference source first, then switch to the difference page to view the results. |